Alternate methods to the Github UI
Introduction
One of the easiest ways to trigger and test a Github Actions workflow is via the Github Actions UI page, which can only be done if that workflow is merged to repository’s default branch (usually main or master). A common supplementary approach to keep the default branch in a working state is merging the basic workflow skeleton into the repository’s default branch, iterating on this workflow in a feature branch, and running the workflow in the context of that feature branch.
However, that approach cannot be used all the time —there are inevitably going to be times you can’t merge into the default branch. How then, can you trigger a workflow you’re currently developing? This article explores various methods that go beyond the UI page, all of them not requiring the workflow being merged to the default branch.
Scenario
The organization org-mushroom-kingdom has a repository ttn-workflows which is solely dedicated to workflows that can be used by the organization. This repository at the moment has a freeze on merging into main, the default branch.
A developer is developing a workflow that calls upon a script to send HTTP requests via cURL to various servers of interest. This work is still expected to be in active development even though the main branch is frozen. The developer only has experience using the approach outlined in the Introduction section above; it’s thus up to them to figure out how they can reliably trigger the workflow without being able to merge into main.
Luckily for them there’s plenty of ways to do this. Let’s dive right in!
Setting Things Up
There is a workflow in ttn-workflows named non-main-workflow.yml that has all the triggers that can be used to activate a workflow when it’s not merged to the default branch.
If you’re following along with this article, you’ll want to:
- Create your own feature branch and copy the non-main-workflow.yml workflow on it.
- Create a personal access token since some triggers involve API usage.
- Set up Postman to use as an API client and prep the payload.
Creating a Feature Branch with the Workflow
We’ll refer to the feature branch you’ll be working with as your-feature-branch. You can choose to make this feature in your own repository or base it off of a forked copy of ttn-workflows. Instructions are provided for the latter:
- Fork the ttn-workflows repo.
- Copy the .github/workflows/non-main-workflow.yml code somewhere or save it to a file.
- In a commit, delete the .github/workflows/non-main-workflow.yml from the main branch.
- Push this commit to main.
- Make a new feature branch named your-feature-branch. Checkout this branch if this has not happened automatically.
- Make a new file with the path .github/workflows/non-main-workflow.yml.
- Paste in the code you copied from Step 2 into the .github/workflows/non-main-workflow.yml file.
- Edit the code that was just pasted: Find all instances of the text feature/matt-test-workflow-without-main-merge. Except for the first instance (a comment near the top of the file), replace all instances with your-feature-branch
- Save the file, and make a commit. (Note: This will trigger the workflow due to the push trigger present.)
Creating a Personal Access Token
API calls that can be used to trigger the workflow need a personal access token to function. You can follow Github’s official instructions on how to make a personal access token here. I used a classic personal access token for testing.
The classic token needs repo permissions for the call we’ll be making, so be sure to assign them upon token creation. Don’t forget to copy the token’s value once it has been created!
Open Postman and Prepping the Payload
As a good exercise and to make our API call more visually explicit, we’ll be using the Postman API client.
To get some of our call set up, follow these instructions:
- Open Postman (I used the desktop version to test, but the browser version should be fine).
- In the ttn-workflows repo, find the /docs/payload-for-non-main-workflow.json file, which serves as our payload. Copy its contents and paste them in the Body section of the Postman request.
- Change the ref: in the payload to your-feature-branch
More details about the API call will be covered in the workflow_dispatch section.
Triggers
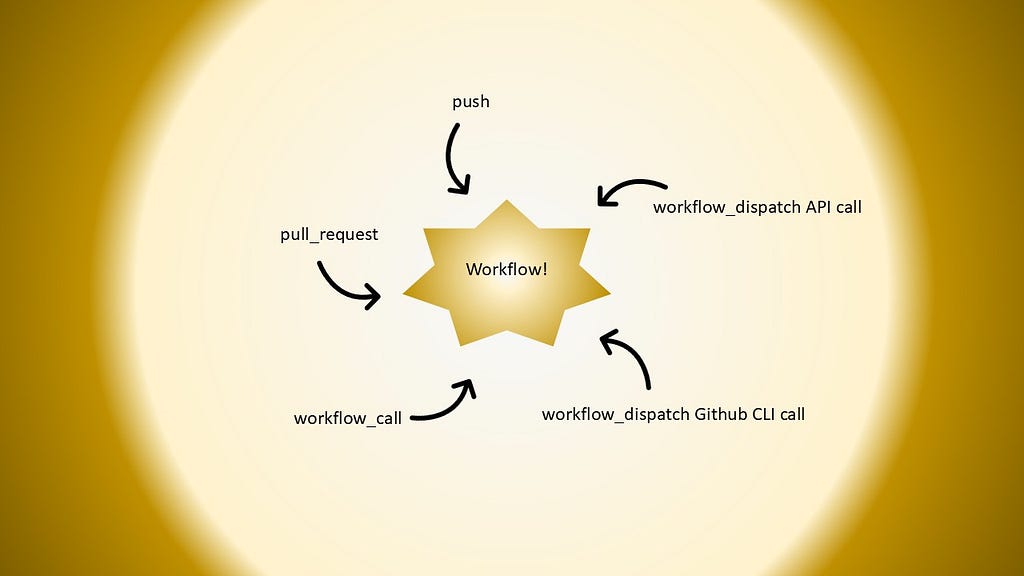
The following triggers can be used to trigger a workflow that has not been merged into the default branch:
- push
- pull_request
- workflow_dispatch (either via API call or Github CLI)
- workflow_call
Making the Workflow Runs Viewable in the Github Actions UI
Before we discuss the triggers, note that if you’re coding alongside this article, be sure to check the Github Actions UI after every time you think you’ve triggered the workflow. Various workflow steps will give more details about how the workflow was triggered.
If you’ve followed along with this guide up to this point, the workflow will already be viewable in the Github Actions UI page due to the presence of the push trigger in the workflow. If you didn’t have the push trigger or commented it out, then the workflow will not be viewable. The general rule of thumb to make [the logs of] a workflow that is not merged into the default branch appear in the Github Actions UI is that the workflow must be run once. In other words, when you trigger the workflow, then you should be able to see its logs.
The general rule of thumb to make a workflow that is not merged into the default branch appear in the Github Actions UI is that the workflow must be run once. In other words, when you trigger the workflow, then you should be able to see its logs.
push
The push trigger is the easiest one to activate. Literally all you need to do is make a commit on your-feature-branch and push it. Note that you’ve already done this once, during the Creating a Feature Branch with the Workflow section.
You can add exclusivity to the push trigger via the paths key. This key will limit the scope of the push trigger based upon the paths (which are actually glob patterns) of the changed files in the commit.
For example, observe the following gist:
https://medium.com/media/9ef953abac4ef88d8c9cf2af7d1a5967/hrefIf paths is set up like the above code, then only commits to the workflow itself or a commit to any file in the docs/ directory will cause the workflow to fire. This kind of selectivity can be particularly useful if your branch has files you want to work on without triggering the workflow each time you make a commit.
pull_request
The pull_request trigger takes slightly more effort to activate than push, but not by much.
To get anywhere with this trigger, we’ll first have to create a pull request.
Follow these instructions to do so:
- Create a new feature branch based off of your-feature-branch. This new branch will be referred to as your-feature-branch-2
- Make a commit with a small insignificant change on your-feature-branch-2
- Open a pull request in the following manner:
base: your-feature-branch
compare: your-feature-branch-2
In other words, the source branch should be your-feature-branch-2and the target branch should be your-feature-branch
Once the pull request has been created, this should trigger the workflow as this activity corresponds the opened activity type. See the below subsection for more information regarding activity types and different ways to activate the pull_request trigger.
Activity Types
The default activity types of pull_request are used: opened, synchronize, and reopened per official documentation. You’ve already trigger the opened activity type since you created the pull request.
Now that the PR exists, you can activate the other types of pull_request trigger activity types:
- synchronize: While the PR is open, make a commit to the your-feature-branch-2, the source branch of the PR. (Note: This is the easiest of the three activity types to trigger)
- reopened: Close and reopen the PR
The Github Actions UI shows the activity type that was triggered in both the workflow runs page and on the individual workflow run, but personally I found it a little easy to miss. Thus, non-main-workflow.ymlhas a step “Echo workflow trigger, activity type (if exists)” that will tell you the specific activity type triggered via the following logic:
https://medium.com/media/7273e33a43701df9c68a1f7a3b222bf2/hrefgithub.event.action gives the value of the activity type that was triggered (Note: Only if the event uses activity types, not all events do). The code above is saying “If there is an activity type (github.event.action is NOT an empty string), then print it out and highlight it in yellow”
workflow_dispatch
Typically, workflow_dispatch is most easily activated by interacting with the Github Actions UI. In this scenario, however, we don’t have the ability to do that. Luckily, workflow_dispatch has other ways it can be triggered that aren’t dependent on the workflow being merged to the default branch. These methods also allow for the use of inputs, which non-main-workflow.ymlutilizes.
Inputs
The workflow_dispatch inputs our workflow uses can be seen below:
https://medium.com/media/f4a5f2d0e37a778046182d2e431bb604/hrefThe notes and triggered-by-api inputs allow one to give more context into the specifics of how the workflow_dispatch was activated. The perform-server-check allows us to skip the actual business logic of the workflow if desired, since for this scenario we’re often more concerned with triggering the workflow itself rather than the execution of its code.
non-main-workflow.yml has a step “workflow_dispatch: Read inputs” that specifically shows the value of these inputs, which can be useful if you’re activating the workflow_dispatch event in different ways like we’re about to. You can even utilize the inputs to signify you’re activating workflow_dispatch via the Github UI if you decide to eventually merge into the default branch, making this step even more valuable.
API call
Using the Github API’s “Create a workflow dispatch event” endpoint we can activate the workflow_dispatch trigger, complete with inputs.
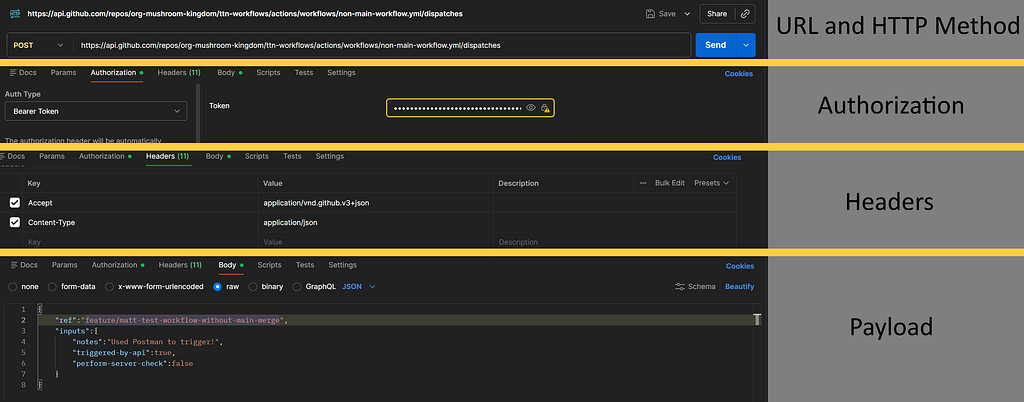
Earlier, we opened Postman and set up our payload to prepare making this API call. Let’s take a closer look at all the parts needed using the screenshot below.
HTTP Method
Per the documentation our HTTP method must be of type POST.
URL
Our URL to make the call to follows the format of https://api.github.com/repos/<OWNER>/<REPO>/actions/workflows/<WORKFLOW-FILENAME.yml>/dispatches
<OWNER> is the owner of a specific repository, specified by <REPO>. The <WORKFLOW-FILENAME.yml> is the filename of the workflow to trigger.
Authorization
Our Authorization header must be of type Bearer (selectable in Postman’s Auth Type dropdown as Bearer Token). The value for this header is the token that was created earlier in the Setting Things Up: Creating a Personal Access Token section.
Other Headers
The other headers I used as part of the HTTP request are:
- Accept: application/vnd.github.v3+json
- Content-Type: application/json
I omitted the X-GitHub-Api-Version header to no ill effect for this scenario. That being said, you generally should use this header as a best practice per official documentation.
Payload
Observe the following gist. (It’s the payload you copied earlier.)
https://medium.com/media/be8066b3d3848da0572ce8825e223c84/hrefThe ref specifies what Git reference the workflow is associated with (this can be a branch or tag name). In my case, the branch I had my workflow on was feature/matt-test-workflow-without-main-merge.
The inputs hash is used to assign the values for the inputs described above. Basically, put together the values are saying “This is an API call triggered by Postman, and I don’t want to invoke the server checking functionality.”
Github CLI
If you have Github CLI installed, you can use it to trigger workflow_dispatch in a more succinct way. It’s important to note that this Github CLI command is essentially a wrapper around the Github API call above, just in a simpler, command-line based format.
For our scenario, the Github CLI command has the following structure:
gh workflow run <WORKFLOW-FILENAME.yml> --ref <ref-value> -f <input-name>=<input-value>
The <WORKFLOW-FILENAME.yml> is the filename of the workflow to trigger. The ref specifies what Git reference the workflow is associated with (ref-value can be a branch or tag name). The -f flag is a way to pass in an input: <input-name> is the name of the input, <input-value> is the value to give that input.
I used Git Bash to run the following Github CLI command:
https://medium.com/media/3c6dccab0db0d30760d3842a7de81023/hrefWe specify our workflow to be non-main-workflow.yml, and the ref to be feature/matt-test-workflow-without-main-merge. For our notes input, we’ll put that this workflow is being triggered by Github CLI. Since the Github CLI is basically a wrapper for a Github API call, we’ll set triggered-by-api as true. For this test, we don’t care to do the server check, so we set perform-server-check as false.
In other words, the command is saying “Use workflow_dispatch to trigger the non-main-workflow.ymlworkflow, specifically using the ref feature/matt-test-workflow-without-main-merge. When you trigger it, the notes should say this trigger was from Github CLI. Say that the workflow was triggered by API and don’t do the server check logic.”
workflow_call
Technically, you can also use workflow_call to trigger a workflow that isn’t merged into the default branch. I can’t think of a reason why you’d use this approach over the others, but it is possible. Perhaps one such application would be using a caller workflow that has inputs for the reusable workflow name and ref it’s tied to. Regardless, we’ll explore how to use workflow_call to trigger our workflow.
The workflow_call trigger insinuates that the workflow is reusable. Reusable workflows have a corresponding caller workflow. For this scenario, our caller workflow will be called non-main-workflow-caller.yml and it will already be present in ttn-workflows in the main branch.
If you’re coding along with this article, briefly switch your branch back to main, copy the code of the caller workflow here, then commit and push.
inputs
Below is a gist of the workflow_call inputs of non-main-workflow.yml:
https://medium.com/media/83d3373325f469f45e10b5f2757355bf/hrefperform-server-check functions exactly the same as it does in workflow_dispatch. The called-by-caller input is used to signify that non-main-workflow.yml was trigged by workflow call. This is done because when a workflow functions as a reusable (called) workflow, the workflow uses the caller’s github context.
As seen above, we have steps that access the github context in various ways to give us information as to how non-main-workflow.yml was triggered. We don’t want to get things confused, so we’ll leverage called-by-caller like so:
https://medium.com/media/5b8d48452fc5fd94543c6ccfb463338e/hrefBasically, for both steps we assess if called-by-caller is true and determine our output based off that. This helps keep things clear as to how non-main-workflow.yml was triggered.
The non-main-workflow-caller.yml workflow has a workflow_dispatch event with the same inputs as above.
Setting Up the Caller Workflow Job
Our caller workflow job is pretty simple, triggerable via workflow_dispatch. The “Non-main workflow caller Job” job utilizes the uses keyword to specify the workflow to call (the text after the @ signifies what ref that workflow is located on) and with to specify values for the inputs
https://medium.com/media/6b9a440f7508dd155573db8c740257dc/hrefTriggering
To trigger non-main-workflow.ymlvia workflow_call, we’ll take advantage of the fact that non-main-workflow-caller.yml has a workflow_dispatch event and is merged in the default branch — we can just use the Github Actions UI to navigate to and fire it (you probably miss doing this by now)!
Looking at the workflow log when non-main-workflow.yml is triggered via workflow_call is different — you need to look at the runs for non-main-workflow-caller.yml, not non-main-workflow.yml.
The caller workflow has two jobs, the first job (“Echo inputs”) you can just straight up ignore. The second job (“Non-main workflow caller Job”) is what we’re interested in.

The workflow run when this job is highlighted looks pretty much the same, except with some additional content in the highlighted step to inform the reader that non-main-workflow.ymlwas triggered by workflow_call.
With that, you’ve performed all the different ways you can trigger a workflow that hasn’t been merged to the default branch. Congratulations!
Conclusion
At this point you have read about various ways to trigger a workflow that has not been merged to the default branch, and maybe even tested these different methods yourself. You’ve seen that different options allow for different flexibilites, such as the paths key for push and pull_request or inputs for workflow_dispatch and workflow_call. With this knowledge, you can confidently develop and trigger workflows in ways other than the Github UI, and choose the best fit for your use case. So long, and have fun experimenting!
Sources
Links present in the article are listed here generally in order of appearance.
Please note the following:
- Some links may be present more than once in the article. To keep things brief, only the first instance is listed.
- A # present in the title of the source indicates a bookmark on that page unless otherwise indicated.
- “Getting Started With Github Actions”, Medium (DevOps.dev): https://blog.devops.dev/getting-started-with-github-actions-05ca591797a5
- “Manually running a workflow”, Github: https://docs.github.com/en/actions/how-tos/manage-workflow-runs/manually-run-a-workflow?tool=webui
- “org-mushroom-kingdom”, Github repository: https://github.com/org-mushroom-kingdom
- “ttn-workflows”, Github repository: https://github.com/org-mushroom-kingdom/ttn-workflows
- “Managing your personal access tokens #Creating a personal access token (classic)”, Github: https://docs.github.com/en/authentication/keeping-your-account-and-data-secure/managing-your-personal-access-tokens#creating-a-personal-access-token-classic
- “Postman: The World’s Leading API Platform”, Postman homepage: https://www.postman.com/
- “Workflow syntax for GitHub Actions #Patterns to match branches and tags”, Github: https://docs.github.com/en/actions/reference/workflows-and-actions/workflow-syntax#patterns-to-match-branches-and-tags
- “Events that trigger workflows #pull_request”, Github: https://docs.github.com/en/actions/reference/workflows-and-actions/events-that-trigger-workflows#pull_request
- “REST API endpoints for workflows #Create a workflow dispatch event”, Github: https://docs.github.com/en/rest/actions/workflows?apiVersion=2022-11-28#create-a-workflow-dispatch-event
- “API Versions #Specifying an API version”, Github: https://docs.github.com/en/rest/about-the-rest-api/api-versions?apiVersion=2022-11-28#specifying-an-api-version
- “gh workflow run”, Github CLI: https://cli.github.com/manual/gh_workflow_run
- “Github Actions: Creating, Calling, and Testing a Reusable Workflow”, Medium: https://blog.devops.dev/github-actions-creating-calling-and-testing-a-reusable-workflow-08684d697609
- “non-main-workflow-caller.yml”, Github repository file: https://github.com/org-mushroom-kingdom/ttn-workflows/blob/main/.github/workflows/non-main-workflow-caller.yml
- “Reusing workflow configurations #github context”, Github: https://docs.github.com/en/actions/reference/workflows-and-actions/reusing-workflow-configurations#github-context
- “Contexts reference #github context”, Github: https://docs.github.com/en/actions/reference/workflows-and-actions/contexts#github-context

Triggering a Github Actions Workflow Without Merging Into The Default Branch: A Guide was originally published in Level Up Coding on Medium, where people are continuing the conversation by highlighting and responding to this story.


