A technical deep-dive into OS-level window management, Electron APIs, and the platform-specific tricks that make an overlay truly invisible
TL;DR — Building a desktop overlay that’s invisible to screen sharing requires going deeper than Electron’s surface-level APIs. You need to understand how each OS captures windows, use the right combination of BrowserWindow properties, handle platform-specific edge cases (especially macOS Zoom), and manage focus behavior so the overlay doesn’t leave traces. This article walks through the actual techniques I used building Ezzi.
The Problem
Here’s the situation. You’re building a desktop overlay — an always-on-top transparent window that floats above other applications. Maybe it’s a productivity tool, a note-taking overlay, a teleprompter, or in my case, an interview assistant called Ezzi.
The overlay needs to be visible to the user but completely invisible when they share their screen. Not “mostly hidden.” Not “kinda transparent.” Invisible. As in the person on the other end of the screen share sees absolutely nothing.
This sounds simple until you actually try to do it. And then you discover that “invisible to screen sharing” means different things on different operating systems, different video conferencing apps, and different capture methods.


Let me walk you through how I solved this.
How Screen Sharing Actually Works
Before we can hide from screen capture, we need to understand how screen capture works. And it’s different on every platform.
Windows: Three Capture APIs
Windows has evolved its screen capture APIs over the years. Modern apps use one of three approaches.
BitBlt (Legacy)
The oldest method. BitBlt copies pixels from one device context to another. Many older screen recording tools still use this. It operates on the GDI layer and captures whatever’s rendered to the screen device context.
Desktop Duplication API (DXGI)
Introduced in Windows 8. This is what most modern screen sharing apps use — Zoom, Teams, Discord. It captures the final composited desktop output directly from the GPU, which means it sees everything the DWM (Desktop Window Manager) composites together.
Windows Graphics Capture (WGC)
The newest API, introduced in Windows 10. This is what UWP apps and newer tools use. It can capture specific windows or the entire screen, and it’s the most “aware” of window properties and system policies.
The key thing here: all three methods respect a Windows API called SetWindowDisplayAffinity. This is our way in.
macOS: CGWindowListCreateImage and ScreenCaptureKit
macOS screen capture is conceptually simpler but has its own complications.
The traditional approach uses CGWindowListCreateImage, which composites windows into a single image. Apps specify which windows to include using various option flags. Most screen sharing tools on macOS use this under the hood.
Apple introduced ScreenCaptureKit in macOS 12.3 as a more modern alternative. It provides filter-based capture where apps can include or exclude specific windows and applications. Think of it as a query-based approach to screen capture — you describe what you want, and the system delivers it.
On macOS, the equivalent mechanism is the window’s sharingType property. Setting it to NSWindowSharingNone tells the window server to exclude the window from capture operations.
Both APIs respect this property. But — and this is a significant “but” — some apps have historically used more aggressive capture methods that bypass it. More on that when we get to the Zoom problem.

The Electron Foundation
Ezzi is built with Electron 37+ and React 19+. The overlay is an Electron BrowserWindow with a very specific set of properties. Let me walk through the ones that matter.
The Base Window Configuration
In Ezzi, the window config lives in a dedicated config file. Here’s what the base settings look like for the Live Interview mode:
// electron/window-config/configs/LiveInterviewConfig.ts
export const LiveInterviewConfig: WindowConfig = {
  baseSettings: {
    width: 500,
    height: 420,
    alwaysOnTop: true,
    show: true,
    fullscreenable: false,
    focusable: true,
    enableLargerThanScreen: true,
    frame: false,
    hasShadow: false,
    transparent: true,
    skipTaskbar: true,
    titleBarStyle: 'hidden',
    backgroundColor: '#00000000',
    type: 'panel',
    paintWhenInitiallyHidden: true,
    movable: true,
  },
  // ...behavior configs
};
Let’s break down why each property matters.
transparent: true with backgroundColor: ‘#00000000’ makes the window fully transparent. The #00000000 is ARGB with zero alpha. Without this combo, you get a white or system-colored rectangle. Not very invisible.
frame: false with titleBarStyle: ‘hidden’ removes the native window frame entirely. No title bar, no close/minimize/maximize buttons.
hasShadow: false is a macOS-specific detail. Windows get a subtle drop shadow by default. Even a transparent window can cast a shadow, and that shadow shows up in screen captures.
type: ‘panel’ is one of the less obvious but important settings. On macOS, this creates a panel-style window that behaves differently from a regular window. Panels don’t appear in the Dock’s window list and have different focus behavior — they can float above other apps without stealing the active state.
skipTaskbar: true hides the window from the Windows taskbar. You don’t want a mysterious app icon appearing while someone’s watching your screen.
enableLargerThanScreen: true lets the window extend beyond the screen edges. This is useful when moving the overlay around — you don’t want it snapping back when it partially goes off-screen.
The window creation in the main process then merges these settings with platform-specific options:
// electron/main.ts
const windowsSpecificOptions =
  process.platform === 'win32' && platformConfigForCreation.win32
    ? { thickFrame: platformConfigForCreation.win32.thickFrame }
    : {};

const baseWindowSettings: Electron.BrowserWindowConstructorOptions = {
  ...windowConfig.baseSettings,
  ...windowsSpecificOptions,
  x: state.currentX,
  y: 50,
  webPreferences: {
    nodeIntegration: false,
    contextIsolation: true,
    preload: isDev
      ? path.join(__dirname, '../dist-electron/preload.js')
      : path.join(__dirname, 'preload.js'),
    scrollBounce: true,
  },
};

state.mainWindow = new BrowserWindow(baseWindowSettings);t
Notice thickFrame: false on Windows. This disables the Windows “thick frame” style that allows resizing from the edges. Without it, Windows would render resize handles around the window — visible artifacts on a supposedly invisible overlay.
This gives you a transparent, frameless, always-on-top window. But it’s still visible to screen capture. The next step is the critical one.
The Invisibility Switch
Right after creating the window, we apply the three core protection calls:
// electron/main.ts
state.mainWindow.setContentProtection(true);
state.mainWindow.setVisibleOnAllWorkspaces(true, {
  visibleOnFullScreen: true,
});
state.mainWindow.setAlwaysOnTop(true, 'screen-saver', 1);
setContentProtection(true) is the core mechanism. Under the hood, it does platform-specific work.
On Windows, it calls:
// What Electron does internally on Windows
SetWindowDisplayAffinity(hwnd, WDA_EXCLUDEFROMCAPTURE);
WDA_EXCLUDEFROMCAPTURE was introduced in Windows 10. It tells the DWM to exclude this window from all capture operations. The window simply doesn’t exist as far as screen sharing is concerned.
Before this flag existed, the older WDA_MONITOR flag was the only option. It would replace the window content with a black rectangle in captures rather than making it fully invisible. WDA_EXCLUDEFROMCAPTURE is strictly better — the window doesn’t show up at all, not even as a blank region.
On macOS, it calls:
// What Electron does internally on macOS
[nsWindow setSharingType:NSWindowSharingNone];
NSWindowSharingNone tells the window server that this window should not be included in any screen sharing or capture operations. It’s been available since early macOS versions, tho the behavior has evolved across different macOS releases.
The interesting part is that this is a single Electron API call abstracting away two completely different OS-level mechanisms. You don’t need to write native code or use node-ffi. Electron handles the platform dispatch.
The Always-On-Top Level
Setting alwaysOnTop: true in the constructor is just the starting point. Electron lets you specify the *level* of always-on-top, and the level matters a lot. In Ezzi, all visibility states use ’screen-saver’:
// electron/window-config/configs/LiveInterviewConfig.ts
showBehavior: {
  opacity: 1,
  ignoreMouseEvents: false,
  skipTaskbar: true,
  alwaysOnTop: true,
  alwaysOnTopLevel: 'screen-saver',
  visibleOnAllWorkspaces: true,
  visibleOnFullScreen: true,
  focusable: true,
  contentProtection: true,
},
Electron supports several window levels: ’normal’, ’floating’, ’torn-off-menu`, ’modal-panel’, ’main-menu’, ’status’, ’pop-up-menu’, and ’screen-saver’.
For an interview overlay, you want it above everything — including the full-screen mode that some interview platforms use. ’screen-saver’ is the highest level before system-level windows, so it stays on top even when the interview platform goes full-screen.
The visibleOnAllWorkspaces: true with visibleOnFullScreen: true ensures the overlay persists across all macOS virtual desktops and doesn’t disappear when another app enters full-screen mode.

Config-Driven Visibility States
One design decision that paid off was treating visibility as a configuration problem rather than scattering setContentProtection and setIgnoreMouseEvents calls throughout the codebase.
Ezzi defines a WindowVisibilityConfig type:
// electron/window-config/WindowConfig.ts
export interface WindowVisibilityConfig {
  opacity: number;
  ignoreMouseEvents: boolean;
  skipTaskbar: boolean;
  alwaysOnTop: boolean;
  alwaysOnTopLevel:
    | 'normal'
    | 'floating'
    | 'torn-off-menu'
    | 'modal-panel'
    | 'main-menu'
    | 'status'
    | 'pop-up-menu'
    | 'screen-saver';
  visibleOnAllWorkspaces: boolean;
  visibleOnFullScreen: boolean;
  focusable: boolean;
  contentProtection: boolean;
}
Then a factory applies these configs atomically:
// electron/window-config/WindowConfigFactory.ts
private applyVisibilityConfig(
  window: BrowserWindow,
  config: WindowVisibilityConfig,
): void {
  const currentBounds = window.getBounds();

  if (config.ignoreMouseEvents) {
    window.setIgnoreMouseEvents(true, { forward: true });
  } else {
    window.setIgnoreMouseEvents(false);
  }
  window.setFocusable(config.focusable);
  window.setSkipTaskbar(config.skipTaskbar);
  window.setAlwaysOnTop(config.alwaysOnTop, config.alwaysOnTopLevel, 1);
  window.setVisibleOnAllWorkspaces(config.visibleOnAllWorkspaces, {
    visibleOnFullScreen: config.visibleOnFullScreen,
  });
  window.setContentProtection(config.contentProtection);
  window.setOpacity(config.opacity);

  window.setBounds(currentBounds);
}
Notice the setBounds(currentBounds) at the end. Without it, some Electron API calls can subtly shift the window position or size. Saving and restoring the bounds ensures the window stays exactly where it was.
This approach means every visibility state — show, hide, queue with screenshots, queue empty — is a declarative config object. Adding a new state means adding a new config, not tracking down scattered imperative calls.
Click-Through Transparency
An invisible overlay is useless if it blocks mouse interaction with the apps underneath. You need the overlay to be “click-through” — mouse events should pass right through it to whatever window is below.
Look at the ignoreMouseEvents field in the config. It switches between states depending on what the user is doing:
// electron/window-config/configs/LiveInterviewConfig.ts
showBehavior: {
  ignoreMouseEvents: false,  // interactive - user can click the overlay
  focusable: true,
  // ...
},
hideBehavior: {
  ignoreMouseEvents: true,   // click-through - events pass to app below
  focusable: true,
  // ...
},
queueWithScreenshots: {
  ignoreMouseEvents: true,   // click-through while displaying screenshots
  focusable: false,          // also not focusable at all
  // ...
},
The { forward: true } option passed to setIgnoreMouseEvents(true, { forward: true }) is important on macOS. Without it, the window simply stops receiving mouse events entirely. With it, mouse events are forwarded to the window below, but the overlay still receives mouse enter/leave events for hover detection.
The toggle between states happens via Cmd+B:
// electron/shortcuts.ts
globalShortcut.register('CommandOrControl+B', () => {
  this.deps.toggleMainWindow();
});
Which triggers this:
// electron/main.ts
let isToggling = false;
function toggleMainWindow(): void {
  if (isToggling) {
    return;
  }

  isToggling = true;

  if (state.isWindowVisible) {
    hideMainWindow();
  } else {
    showMainWindow();
  }

  setTimeout(() => {
    isToggling = false;
  }, 300);
}
The debounce is important. Without it, rapid key presses can trigger multiple show/hide transitions that get the window into a confused state. The 300ms cooldown prevents this.
Press Cmd+B to interact with the overlay. Press it again to make it click-through. This keeps the user’s interaction with the interview platform natural — they’re not alt-tabbing between windows, which would look suspicious.
Focus Detection Prevention
Here’s a subtle problem that most people miss when building overlays. Even if your window is invisible to screen capture, it can still be detected through focus behavior.
Interview platforms can monitor which window has focus. If your overlay steals focus when it becomes interactive, the interview platform detects that its window lost focus — a potential red flag.
What Interview Platforms Can See
Browser-based interview platforms typically monitor two things:
// What interview platforms might run
document.addEventListener('blur', () => {
  reportFocusLoss() // "User switched away from this tab"
})

document.addEventListener('visibilitychange', () => {
  if (document.hidden) {
    reportTabSwitch() // "Tab is no longer visible"
  }
})
The blur event fires when the browser window loses focus to another application. The visibilitychange event fires when the tab becomes hidden (e.g., the user switches to a different tab).
How We Handle Focus
The key insight is in how Ezzi shows the window. Look at this line in showMainWindow():
// electron/main.ts
function showMainWindow(): void {
  if (!state.mainWindow?.isDestroyed()) {
    if (state.windowPosition && state.windowSize) {
      state.mainWindow.setBounds({
        ...state.windowPosition,
        ...state.windowSize,
      });
    }

    const configFactory = WindowConfigFactory.getInstance();

    state.mainWindow.setOpacity(0);
    state.mainWindow.showInactive();  // <-- this is the key

    // Apply appropriate behavior based on current view
    configFactory.applyShowBehavior(state.mainWindow, state.appMode);

    state.isWindowVisible = true;
    state.shortcutsHelper?.registerAllShortcuts();
  }
}
showInactive() instead of show(). This is the critical difference. show() activates the window and gives it focus. showInactive() makes the window visible without stealing focus from the currently active application. The browser running the interview platform stays focused.
The opacity trick (setOpacity(0) before showing, then restored to 1 by the config) prevents a brief visual flash during the state transition.
On top of this, Ezzi re-applies platform-specific configurations whenever the window gains focus, to prevent the OS from overriding our settings:
// electron/main.ts
function handleWindowFocus(): void {
  preserveWindowConfiguration();
}

function preserveWindowConfiguration(): void {
  if (!state.mainWindow || state.mainWindow.isDestroyed()) {
    return;
  }

  const windowConfig = WindowConfigFactory.getInstance().getConfig(
    state.appMode,
  );
  const platformConfig = windowConfig.behavior.platformSpecific;

  if (process.platform === 'darwin' && platformConfig.darwin) {
    state.mainWindow.setWindowButtonVisibility(
      platformConfig.darwin.windowButtonVisibility,
    );
    state.mainWindow.setHiddenInMissionControl(
      platformConfig.darwin.hiddenInMissionControl,
    );
    state.mainWindow.setBackgroundColor(platformConfig.darwin.backgroundColor);
    state.mainWindow.setHasShadow(platformConfig.darwin.hasShadow);
  }

  if (process.platform === 'win32' && platformConfig.win32) {
    state.mainWindow.setMenuBarVisibility(false);
    state.mainWindow.setAutoHideMenuBar(true);
  }
}
Why re-apply on every focus gain? Because macOS and Windows can reset certain window properties during focus transitions. I learned this the hard way — the overlay would occasionally appear with a shadow or window buttons after the system handled a focus event. Re-applying the config on focus ensures consistency.
Platform-Specific Hiding
On macOS, there’s extra work to truly hide the window from the system UI:
// electron/window-config/configs/LiveInterviewConfig.ts
platformSpecific: {
  darwin: {
    hiddenInMissionControl: true,
    windowButtonVisibility: false,
    backgroundColor: '#00000000',
    hasShadow: false,
  },
  win32: {
    thickFrame: false,
  },
},
hiddenInMissionControl: true prevents the overlay from appearing in Mission Control (the three-finger-swipe-up view). Without this, swiping up during an interview would reveal the overlay window.
Why Native Windows Beat Browser Extensions
This is actually one of the key advantages of a native desktop overlay vs. a browser extension approach. Browser extensions that open new tabs, pop-ups, or iframes can trigger visibilitychange and blur events. A native Electron window sitting on top of the browser does not trigger visibilitychange at all — the browser tab is still technically visible and in the foreground.
The blur event is the one we need to manage carefully. And because we control the Electron window’s focus behavior at the OS level — with showInactive(), type: ‘panel’, and careful focus event handling — we have the tools to do it properly.
Shortcut-Based Interaction Model
Ezzi’s entire interaction model is built on global keyboard shortcuts. This isn’t just a convenience — it’s a stealth requirement. Every mouse click on the overlay risks a focus change. Keyboard shortcuts don’t.
Here’s the full shortcut registration:
// electron/shortcuts.ts
public registerAllShortcuts(): void {
  globalShortcut.unregisterAll();

  globalShortcut.register('CommandOrControl+H', () => {
    void (async () => {
      const mainWindow = this.deps.getMainWindow();
      if (mainWindow) {
        const screenshotPath = await this.deps.takeScreenshot();
        const preview = await this.deps.getImagePreview(screenshotPath);
        mainWindow.webContents.send('screenshot-taken', {
          path: screenshotPath,
          preview,
        });
      }
    })();
  });

  globalShortcut.register('CommandOrControl+Enter', () => {
    void this.deps.processingHelper?.processScreenshotsSolve();
  });

  globalShortcut.register('CommandOrControl+G', () => {
    this.deps.processingHelper?.cancelOngoingRequests();
    this.deps.clearQueues();
    this.deps.setView('queue');
    const mainWindow = this.deps.getMainWindow();
    if (mainWindow && !mainWindow.isDestroyed()) {
      mainWindow.webContents.send('reset-view');
    }
  });

  globalShortcut.register('CommandOrControl+Left', () => {
    this.deps.moveWindowLeft();
  });
  globalShortcut.register('CommandOrControl+Right', () => {
    this.deps.moveWindowRight();
  });
  globalShortcut.register('CommandOrControl+Down', () => {
    this.deps.moveWindowDown();
  });
  globalShortcut.register('CommandOrControl+Up', () => {
    this.deps.moveWindowUp();
  });

  globalShortcut.register('CommandOrControl+B', () => {
    this.deps.toggleMainWindow();
  });
}
But here’s the important detail — when the window is hidden, we unregister everything except Cmd+B:
// electron/shortcuts.ts
public registerVisibilityShortcutOnly(): void {
  globalShortcut.unregisterAll();

  setTimeout(() => {
    globalShortcut.register('CommandOrControl+B', () => {
      this.deps.toggleMainWindow();
    });
  }, 500);
}
The 500ms delay prevents a race condition where unregistering and re-registering the same shortcut too quickly can fail silently in Electron.
Why unregister shortcuts when hidden? Two reasons. First, it frees up key combinations like Cmd+H and Cmd+G for other apps. Second, it prevents accidental actions — you don’t want a stray Cmd+Enter generating a solution while the overlay is hidden.
Window Movement and Dynamic Sizing
An overlay that can’t be repositioned is impractical. But window movement introduces its own challenges.
Keyboard-Driven Positioning
Instead of drag-to-move (which requires the window to be interactive and focused), Ezzi uses keyboard shortcuts. The movement functions handle horizontal and vertical axes differently:
// electron/main.ts
state.step = 60; // pixels per move

function moveWindowHorizontal(updateFn: (x: number) => number): void {
  if (!state.mainWindow) {
    return;
  }
  state.currentX = updateFn(state.currentX);
  state.mainWindow.setPosition(
    Math.round(state.currentX),
    Math.round(state.currentY),
  );
}

function moveWindowVertical(updateFn: (y: number) => number): void {
  if (!state.mainWindow || !state.windowSize) {
    return;
  }

  const newY = updateFn(state.currentY);
  // Allow window to go 2/3 off screen in either direction
  const maxUpLimit = (-(state.windowSize.height || 0) * 2) / 3;
  const maxDownLimit =
    state.screenHeight + ((state.windowSize.height || 0) * 2) / 3;

  if (newY >= maxUpLimit && newY <= maxDownLimit) {
    state.currentY = newY;
    state.mainWindow.setPosition(
      Math.round(state.currentX),
      Math.round(state.currentY),
    );
  }
}
Notice the vertical movement has boundary constraints — the window can go 2/3 off screen in either direction. This lets users tuck the overlay mostly off-screen while keeping a sliver visible, without losing it entirely. Horizontal movement has no limits, which lets the window slide to a different monitor.
The 60-pixel step size is a UX tradeoff. Too small and repositioning feels sluggish. Too large and fine-tuning becomes impossible. 60px felt right after testing on multiple screen sizes.
Gaze Alignment
This is a subtle UX detail that affects stealth. The overlay should sit near the coding area of the interview platform. If the user is constantly looking at the top-right corner of the screen while typing in the center, it looks suspicious on camera.
Smart default positioning places the overlay adjacent to where the code editor typically sits in platforms like HackerRank and CoderPad. The keyboard shortcuts let users fine-tune this for each platform’s layout.
Content-Driven Resizing
The overlay also needs to resize based on content. A solution with a detailed thought process needs more space than a compact code snippet:
// electron/main.ts
function setWindowDimensions(
  width: number,
  height: number,
  _source: string,
): void {
  if (state.mainWindow && !state.mainWindow.isDestroyed()) {
    const [currentX, currentY] = state.mainWindow.getPosition();
    const primaryDisplay = screen.getPrimaryDisplay();
    const workArea = primaryDisplay.workAreaSize;
    const maxWidth = Math.floor(workArea.width * 0.4);

    const newWidth = Math.min(width + 32, maxWidth);
    const newHeight = Math.ceil(height);

    let adjustedX = currentX;
    let adjustedY = currentY;
    if (isWindowCompletelyOffScreen(currentX, currentY, newWidth, newHeight)) {
      adjustedX = Math.max(0, (workArea.width - newWidth) / 2);
      adjustedY = Math.max(0, (workArea.height - newHeight) / 2);
    }

    state.mainWindow.setBounds({
      x: adjustedX,
      y: adjustedY,
      width: newWidth,
      height: newHeight,
    });

    state.currentX = adjustedX;
    state.currentY = adjustedY;
    state.windowPosition = { x: adjustedX, y: adjustedY };
    state.windowSize = { width: newWidth, height: newHeight };
  }
}
A few things worth noting here. The 40% max width cap prevents the overlay from covering more than two-fifths of the screen — enough to display code, not enough to completely block the interview platform. The + 32 adds padding for content that sits flush against the edges.
The off-screen detection is a safety net. If the window somehow ends up completely off screen (can happen when an external monitor disconnects), it auto-centers instead of becoming lost forever.
The React renderer calculates the needed size based on its content, sends it to the main process via IPC, and the main process handles the actual resize with these constraints applied.

The macOS Zoom Problem
This is the single biggest platform-specific challenge I encountered building Ezzi. And it’s worth understanding in detail because it reveals how different capture implementations can behave differently even on the same OS.
What Happens
Most screen sharing on macOS uses either CGWindowListCreateImage or ScreenCaptureKit. Both respect NSWindowSharingNone. So when you set setContentProtection(true), the overlay is invisible in Teams, Chime, Google Meet, and all browser-based platforms.
But Zoom on macOS is different.
Zoom implemented its own capture pipeline that, in its default configuration, captures the raw display output rather than compositing individual windows. In this mode, it can see windows that have NSWindowSharingNone set, because it’s not querying the window server for individual window content — it’s reading the display buffer directly.
Think of it this way: NSWindowSharingNone tells the window server “don’t include me when someone asks for window data.” But if someone reads the entire display output instead of asking for window data, that instruction gets bypassed.
The Workaround
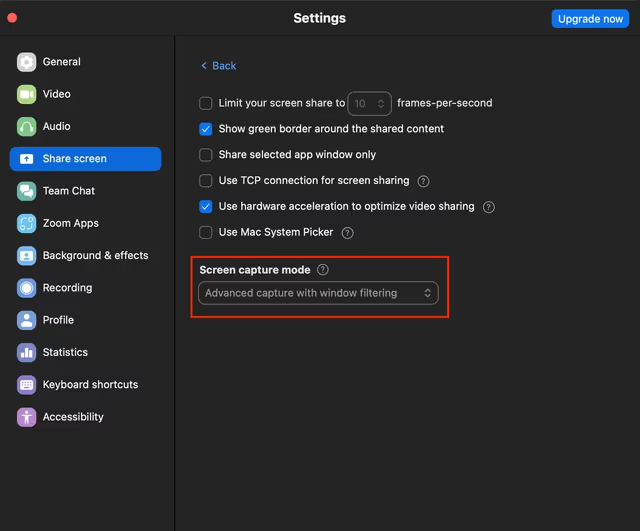
Zoom provides a setting called “Advanced Capture” with window filtering. When this is enabled, Zoom switches from display-level capture to window-level capture that correctly respects NSWindowSharingNone.
From the user’s perspective, the setup is:
1. Open Zoom Settings
2. Go to Screen Share
3. Enable “Use advanced capture with window filtering”
4. When sharing, select the specific application window (not “Desktop” or “Entire Screen”)
With this configuration, Zoom captures only the specified windows and correctly excludes content-protected windows from the output.
This is why Ezzi’s documentation notes that macOS Zoom requires “Advanced Capture with window filtering.” It’s not a limitation of our implementation — it’s a quirk of how Zoom handles capture on macOS.
Why Windows Doesn’t Have This Issue
On Windows, SetWindowDisplayAffinity(WDA_EXCLUDEFROMCAPTURE) is enforced at the DWM level. The Desktop Window Manager sits between applications and the display hardware. When a window has WDA_EXCLUDEFROMCAPTURE set, the DWM excludes it from all output paths — whether that’s BitBlt, DXGI Desktop Duplication, or Windows Graphics Capture.
There’s no way for Zoom (or any capture application) to bypass this on Windows, because the exclusion happens before the captured data is even made available to the application. It’s a fundamentally different architecture than macOS, and in this specific case, it works in our favor.
Staying Ahead of Zoom Updates
Zoom updates its capture implementation regularly. This is one of those things that requires ongoing testing. What works with Zoom 6.0 might behave differently with Zoom 6.1. I monitor Zoom release notes and test each major version to ensure compatibility.
My recommendation for anyone building similar tools: automate what you can, but accept that manual testing against third-party apps is unavoidable. Keep a test matrix and check it with every release.
Process-Level Stealth
Making the window invisible is only part of the story. Some detection approaches don’t look at what’s visible on screen — they look at what processes are running on the system.
Custom Application Naming
Ezzi supports build-time configuration of the application name. There’s a build script that patches the Electron builder config:
// scripts/build-config.js
const productName = process.env.PRODUCT_NAME || 'Ezzi';

const safeProductName = productName
  .replace(/[^a-zA-Z0-9\s-]/g, '')
  .replace(/\s+/g, '-');

const packagePath = path.join(__dirname, '..', 'package.json');
const packageJson = JSON.parse(fs.readFileSync(packagePath, 'utf8'));

packageJson.build.productName = productName;

packageJson.build.mac.artifactName =
  `${safeProductName}-Mac-\${arch}-\${version}.\${ext}`;
packageJson.build.win.artifactName =
  `${safeProductName}-Windows-\${version}.\${ext}`;

fs.writeFileSync(packagePath, JSON.stringify(packageJson, null, 2) + '\n');
Usage is simple:
PRODUCT_NAME="System Monitor" npm run build
This changes the process name in Activity Monitor and Task Manager, the application name in the dock/taskbar, and the artifact name for distribution.
If someone inspects your running processes, they see “System Monitor” instead of anything that would raise questions.
The script sanitizes the name with regex to create a safe filename version. No special characters, spaces become hyphens. This matters because the artifact name becomes the installer filename and the application bundle name on macOS. There’s no rename hack or post-build patching — the name goes into package.json before electron-builder runs, so it’s compiled with the custom identity from the start.
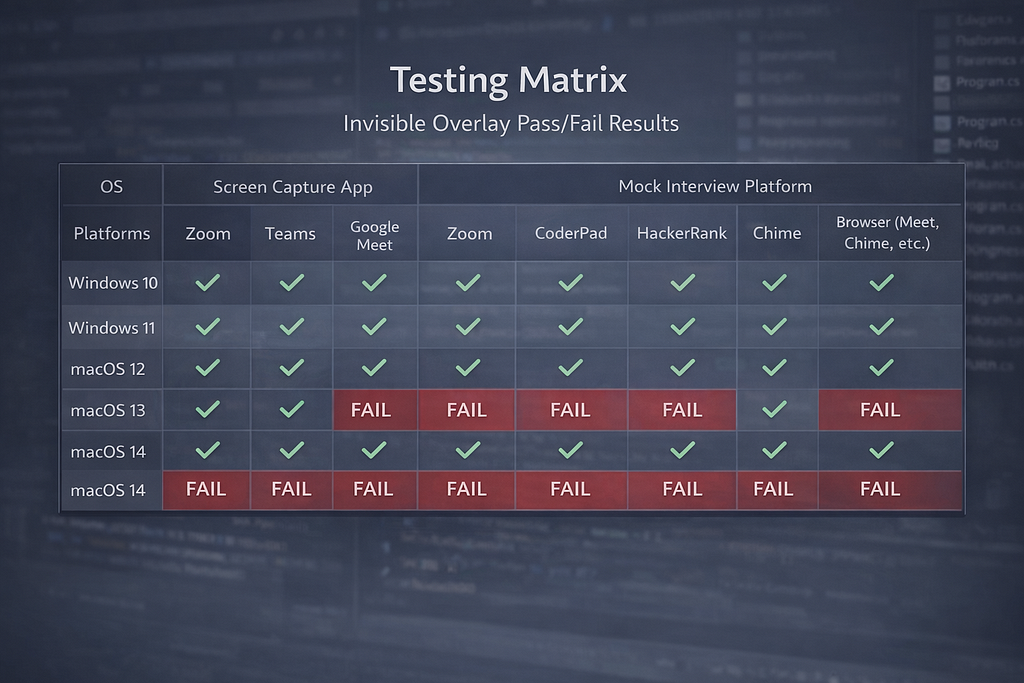
Testing Across Platforms
Here’s what made this whole project particularly challenging: you can’t just test on one machine and call it done. The behavior varies across:
- Windows 10 vs Windows 11
- macOS 12 through macOS 15
- Zoom vs Teams vs Google Meet vs Chime
- Native desktop apps vs browser-based platforms
- Different versions of the same app (Zoom changes capture behavior between updates)
My Testing Approach
Automated build verification. CI/CD pipelines build for Windows and macOS on every PR. This catches configuration regressions.
Manual capture testing. For each platform combination, I share the screen with a second device and verify the overlay is invisible. This can’t be fully automated because screen capture behavior depends on the capture application, its version, and its settings.
Focus monitoring. Run browser developer tools on interview platform mock pages and verify no blur or visibilitychange events fire when interacting with the overlay. This is scriptable and can be part of a semi-automated test suite.
Process inspection. Verify the custom app name appears correctly in Activity Monitor and Task Manager across different build configurations.
The matrix of combinations is large, and each OS or app update can potentially change things. This is ongoing maintenance, not a one-time implementation.
What I Learned
Building this taught me a few things that might be useful to anyone working with Electron overlays or OS-level window management.
Electron’s abstractions are good but not complete. setContentProtection works well for the common case. But understanding what it does at the OS level — SetWindowDisplayAffinity on Windows, setSharingType on macOS — helps you debug platform-specific issues and understand why certain edge cases exist.
Windows is actually easier here. WDA_EXCLUDEFROMCAPTURE is enforced at the DWM compositor level. No capture application can bypass it. macOS is more nuanced because different capture APIs have different levels of respect for NSWindowSharingNone, and apps like Zoom can choose which API to use.
Config-driven window management pays off. Scattering setIgnoreMouseEvents and setContentProtection calls throughout the codebase leads to bugs. Declarative config objects for each visibility state made the system predictable and easy to extend.
Focus management is harder than rendering. Making the window invisible to capture is relatively straightforward — it’s mostly one API call. Making sure it doesn’t trigger focus-loss detection on the interview platform is the more subtle engineering challenge. showInactive(), type: ‘panel’, and re-applying configs on focus events — these details make the difference.
Testing is never done. Every OS update, every Zoom update, every new interview platform version can change the capture behavior. You need an ongoing testing strategy, not just a one-time verification pass.
The Bigger Picture
The techniques here aren’t unique to interview assistants. Any application that needs to display sensitive or private content while the user is sharing their screen benefits from these patterns. Password managers, medical information overlays, confidential communications tools — they all face the same fundamental challenge.
The OS-level mechanisms exist precisely because there are legitimate use cases for windows that shouldn’t be captured. Electron makes them accessible through a clean API, and with the right combination of window properties, focus management, and platform-specific handling, you can build an overlay that’s truly invisible.
If you want to see this in action or dig through the actual implementation, Ezzi is open source: https://github.com/GetEzzi/ezzi-app.
If you’re building Electron overlays or working with screen capture APIs, I’d love to hear about your platform-specific war stories. The edge cases are endless, and sharing knowledge makes everyone’s implementations better.
I hope this was helpful. Good luck, and happy engineering!
How I Made a Desktop App Invisible to Screen Sharing (Electron + OS-Level Tricks) was originally published in Level Up Coding on Medium, where people are continuing the conversation by highlighting and responding to this story.

