Many articles mention Keycloak’s SSO features, but they often skip over how it works behind the scenes. Understanding this is really important for architects and developers working with Keycloak. In this article, we’re excited to explore this together. We’ll set up a simple environment using Docker Compose, with Keycloak and two Angular applications on different domains, to show you how cookie-based SSO operates. We’ll dive deep into the details, helping you grasp the key concepts more clearly. I believe this will be very helpful for:
- architects
- developers who customize Keycloak using custom SPIs
- companies looking to leverage SSO functionality
The GitHub repo with our examples is available at: https://github.com/TorinKS/sso-mfe-keycloak
Our Docker Compose setup consists of the following components:
- An Angular mfe-a application, hosted on the local domain mfe-a.home.arpa.
- An Angular mfe-b application, hosted on the local domain mfe-b.home.arpa.
- Keycloak, hosted on the domain sso.home.arpa.
- HAProxy, configured to enable working with these domains on localhost using FQDNs, which is important for handling cookies correctly.
Cookie-based authentication
Before we dive into understanding cookie-based SSO in Keycloak, let’s take a moment to look at an example architecture of a typical application or framework that uses cookies for authentication.
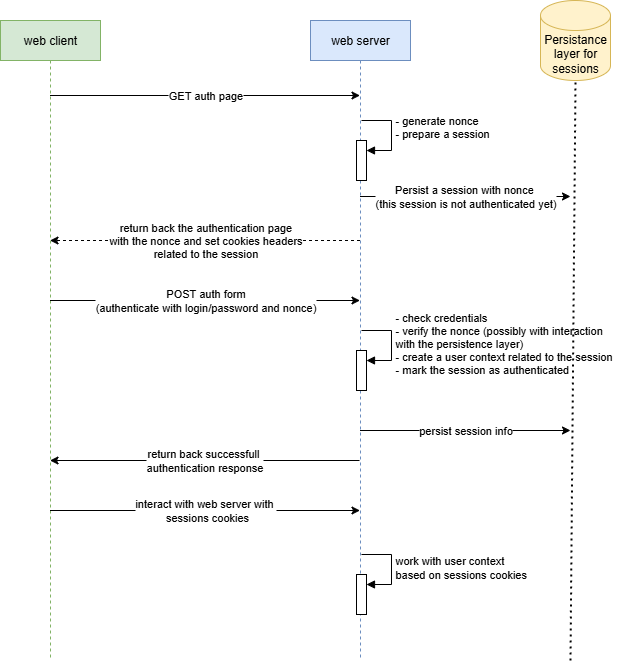
So, we reuse the browser’s cookies to automatically authenticate the user’s browser, and before these steps have been performed:
- the browser (web client/user agent) sends a GET request to retrieve the authentication form.
- the web server (framework) generates the form and inserts a special random value (“nonce”), which helps prevent replay attacks. Typically, this “nonce” is included as a hidden element in the HTML form. Additionally, the server creates a session, which is stored in a database, file system, cache, or similar storage, and is not yet authenticated. The session is linked to the “nonce” so that the server can verify during authentication that the same browser, along with the corresponding session cookies, initially received the authentication form.
- during authentication, the client submits the authentication form together with the “nonce.” If the data is valid, the web server marks the session as authenticated. After this, the web client can communicate with the web server (or other backends) that support this session-based authentication until the cookies expire.
We can say that this cookie-based authentication helps us avoid re-entering a login and password each time we want to access a web page. Additionally, cookies are typically HTTP-only and tied to a particular domain, which mitigates an attacker’s ability to manipulate these cookies in the browser.
Now, picture your organization managing a hundred applications, each with its own set of domains and cookies. This setup results in session cookies for various domain names, such as:
- app1.company.com
- jira.company.com
- gitlab.company.com, and so on.
You can also find a detailed guide on Keycloak sessions in this article.: https://medium.com/@torinks/keycloak-sessions-67c118107263
This is where a centralized authentication solution with SSO capabilities (like Keycloak) comes into play. This provides several key benefits for us:
- by using a single authentication service, we can easily connect and work with users from other services like AD and OpenLDAP.
- implement security policies like MFA and strong passwords all in one easy place, making it simple to keep everything secure.
- remove the necessity to implement authentication logic in every service by centralizing this responsibility.
- set authentication cookies on our main service and reuse them for other services, making it easy to enjoy seamless login with cookie-based SSO.
From a service integration perspective, implementing SSO-enabled authentication requires just a few simple key steps:
- Create OIDC client in Keycloak for your application and configure
- Integrate an OAuth/OIDC client library suitable for your application framework with your centralized authentication solution (Keycloak in our case) by using a few parameters and the previously created OIDC client.
When a user attempts to access a protected resource, the OIDC client library automatically initiates the authentication process. For web, mobile, and desktop applications, as well as user-based browser authentication, “Authorization Code Flow” is typically employed. The library redirects the user’s browser to Keycloak’s authentication endpoints. After successful authentication, Keycloak maintains persistent SSO sessions through secure cookies and provides standard OAuth tokens to the requesting application. There are many nuances here, such as in some cases where tokens are directly provided to applications (like mobile and desktop applications), while in other cases, the backend receives the tokens, and the browser only gets an ID token and cookies. Additionally, some JavaScript libraries retrieve and store tokens, whereas in other scenarios, such as with the “token handler pattern,” the HTTP-only cookies are returned to the frontend.
The true power of this architecture becomes clear during subsequent authentication attempts. When a user navigates to another application, this redirect mechanism is triggered again, and the browser reuses existing Keycloak SSO session cookies. Keycloak recognizes these valid session cookies, bypassing the username/password challenge and seamlessly issuing appropriate tokens to the requesting application.
Furthermore, the same method applies to mobile platforms, where mobile applications can reuse external user agents and their capabilities to handle cookies, just like browsers, to enable SSO for multiple mobile apps on the same device. See https://datatracker.ietf.org/doc/html/rfc8252 for more details. Regarding desktop applications, the situation is similar — you just reuse the desktop browser.
Keycloak cookie-based SSO
So, let’s examine Keycloak cookie-based authentication. But before we begin, take a look at the simplified Authorization Code (the authentication flow typically used by default in browser-based applications — https://datatracker.ietf.org/doc/html/rfc6749) flow UML sequence diagram.

There are 3 steps in this flow:
- the client application generates a code verifier and its derived code challenge
- the web client authenticates and receives an authorization code in a 302 HTTP redirect, which is then reused for exchanging it for access token, refresh and id token
- web client redeems the authorization code for a token.
With SSO cookies issued by Keycloak, this flow becomes shorter, as we will see later.
Code example
Our Docker Compose file https://github.com/TorinKS/sso-mfe-keycloak/blob/main/docker-compose.yml include these components:
- haproxy
- angular app mfe-a on mfe-a.home.arpa domain
- angular app mfe-b on mfe-b.home.arpa domain
- Keycloak
- PostgreSQL (for persisting Keycloak configuration)
The https://github.com/TorinKS/sso-mfe-keycloak/blob/main/haproxy/haproxy.cfg HAProxy configuration file defines how incoming HTTP requests are routed to different backend services based on the requested hostname. You can find the breakdown of the main part of the configuration below.
The “ frontend section" defines how incoming requests are handled and routed to backends:
- frontend http-in: defines a frontend named http-in.
- mode http: specifies that this frontend operates in HTTP mode.
- bind *:80: binds the frontend to port 80 on all available network interfaces.
- use_backend mfe-a.home.arpa if { req.hdr(host) -i mfe-a.home.arpa }: routes requests to the mfe-a.home.arpa backend if the host header matches mfe-a.home.arpa (case-insensitive).
- use_backend mfe-b.home.arpa if { req.hdr(host) -i mfe-b.home.arpa }: routes requests to the mfe-b.home.arpa backend if the host header matches mfe-b.home.arpa.
- use_backend sso.home.arpa if { req.hdr(host) -i sso.home.arpa }: routes requests to the sso.home.arpa backend if the host header matches sso.home.arpa.
The "backend sections" define how requests are forwarded to specific servers:
- backend mfe-a.home.arpa: defines a backend named mfe-a.home.arpa.
- mode http: specifies that this backend operates in HTTP mode.
- server mfe-a.home.arpa ${MFE_A_IP}:${MFE_A_EXPOSED_PORT} check: forwards requests to the server at ${MFE_A_IP}:${MFE_A_EXPOSED_PORT} and performs health checks.
The same applies to the mfe-b.home.arpa backend. Both configurations are similar, as each points to an Angular application hosted on a Node.js web server. The main difference is that the two applications use different OIDC client configurations in keycloak-init.factory.ts: one is configured with the ‘mfe-a’ OIDC client, while the other uses ‘mfe-b’. This was specifically done to allow you to see how SSO works in Keycloak for the same user and different OIDC clients (applications), and this setup can be scaled infinitely — one user with multiple sessions and tokens for different OIDC clients.
We also have a special script here that creates all the needed configuration in Keycloak to avoid manual work — https://github.com/TorinKS/sso-mfe-keycloak/blob/main/configure.sh :
- realm “company-external”
- OIDC clients with their configuration (we use public OIDC clients, which are recommended for frontend SPA)
- user test-user with the same password
Each Angular application uses keycloak-angular lib and the configuration as shown below
const KC_OPTIONS: KeycloakOptions = {
  config: {
    url: 'http://sso.home.arpa/auth',
    realm: 'company-external',
    clientId: 'mfe-a',
  },
  initOptions: {
    onLoad: 'login-required',
    flow: 'standard',
    checkLoginIframe: false,
    enableLogging: true,
    useNonce: true,
    adapter: 'default',
    pkceMethod: 'S256',

  },
  loadUserProfileAtStartUp: true
};
This is an OIDC configuration for the Angular Library, which was mentioned above as a required component to enable SSO authentication in your application. Essentially, these few lines of code are all that’s needed to implement centralized authentication and support cookie-based SSO.
Our Keycloak configuration has:
- two public OIDC clients mfe-a, mfe-b
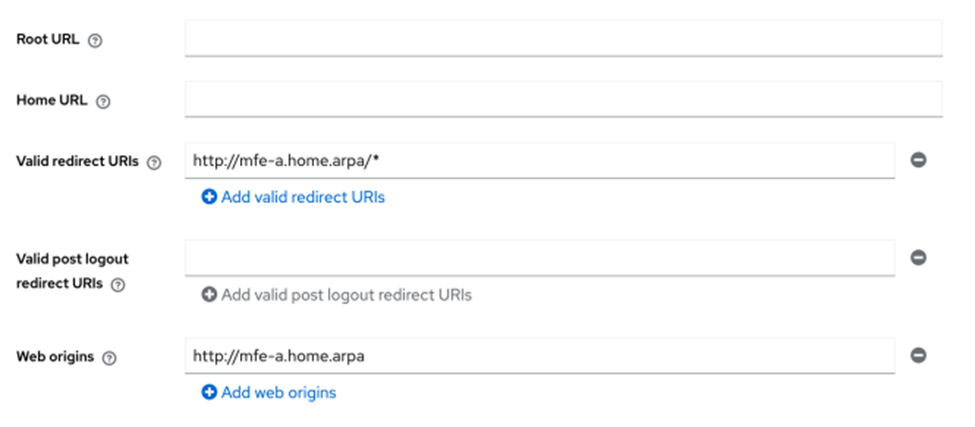
- for each of OIDC client, we configure Valid Redirect URIs and Web origins
A valid Redirect URI parameter is required so Keycloak can redirect the authorization code to the correct location, and web origins parameters properly configure CORS for the frontends AJAX interaction from one subdomain to another in order to retrieve tokens for example).
Another aspect is that for browser-based authentication, Keycloak uses predefined steps involved in the authentication process used by Browser Built-in flow
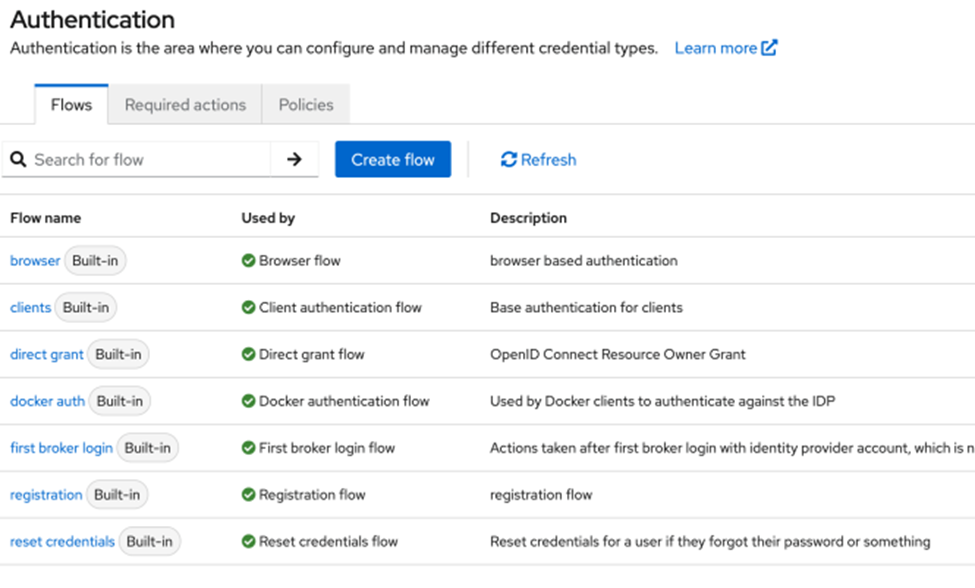
That flow includes cookie-based authentication as the first step:

The “Alternative” parameter tells Keycloak to use one of the available authentication:
- Cookie
- Identity Provider Redirector
- Forms
If authentication cookies are available in the request to /auth endpoint the authentication will be finished on this “Cookie” step.
To see all this in action, just clone, configure, and start the project with Docker Compose. Open http://mfe-a.home.arpa address and Dev Tools in Chrome and in Network tab check “Preserve log” and “Disable cache” checkboxes, you will see that Angular application redirects browser to sso.home.arpa

This is the first request to /auth endpoint: http://sso.home.arpa/auth/realms/company-external/protocol/openid-connect/auth
During authentication with ‘test-user’ login and ‘test-user’ password, you will reach 2-nd /authenticate endpoints as shown below
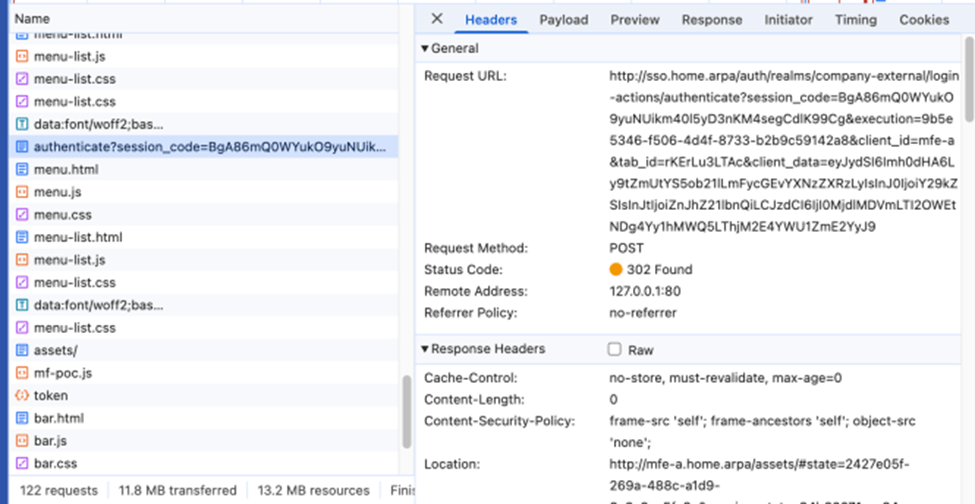
http://sso.home.arpa/auth/realms/company-external/login-actions/authenticate?client_id=mfe-a&tab_id=7vH0Q8mRL44&client_data=eyJydSI6Imh0dHA6Ly9tZmUtYS5ob21lLmFycGEvYXNzZXRzLyIsInJ0IjoiY29kZSIsInJtIjoiZnJhZ21lbnQiLCJzdCI6IjQ4OTE3NWQ2LTk1NjYtNGMwZS1hYTQwLTFlZGQ3YjhlYmQ5NyJ9
and you get back 302 Redirect with Authorizatin Code in the Location field (code parameter) as in the example below
http://mfe-a.home.arpa/assets/#state=2427e05f-269a-488c-a1d9-8c3a8ae5fa6c&session_state=94b63071-cc84-4c08-a1ec-4e6e18d59b1e&iss=http%3A%2F%2Fsso.home.arpa%2Fauth%2Frealms%2Fcompany-external&code=43dae82f-8f83-4e6b-8203-84e0575cf329.94b63071-cc84-4c08-a1ec-4e6e18d59b1e.acd095ce-53c4-47fc-8886-545b2890b684
And the last request is the POST request to /token endpoint
http://sso.home.arpa/auth/realms/company-external/protocol/openid-connect/token
and finally, we get back our tokens
{ "access_token": "eyJhbGciOiJSUzI1NiIsInR5cCIgOiAiSldUIiwia2lkIiA6ICJHbXZ1Sjh2ZmdVd1BCSDZFS2FaQTB4M1djMWNFT1BxR01yc2d2WmNIWGRvIn0.eyJleHAiOjE3NDI5MzA2NzMsImlhdCI6MTc0MjkzMDM3MiwiYXV0aF90aW1lIjoxNzQyOTMwMzU3LCJqdGkiOiIwYzlkZjE0NS0xYjQ3LTQyZjctYWNmNS0zYmMzNDZjMjkyOGIiLCJpc3MiOiJodHRwOi8vc3NvLmhvbWUuYXJwYS9hdXRoL3JlYWxtcy9jb21wYW55LWV4dGVybmFsIiwiYXVkIjoiYWNjb3VudCIsInN1YiI6ImVmM2ZmMWVjLWY0NjctNGFhZC05OWIyLTMwNDY2ZjdkNmQ0MCIsInR5cCI6IkJlYXJlciIsImF6cCI6Im1mZS1hIiwic2lkIjoiOTRiNjMwNzEtY2M4NC00YzA4LWExZWMtNGU2ZTE4ZDU5YjFlIiwiYWNyIjoiMSIsImFsbG93ZWQtb3JpZ2lucyI6WyJodHRwOi8vbWZlLWEuaG9tZS5hcnBhIl0sInJlYWxtX2FjY2VzcyI6eyJyb2xlcyI6WyJkZWZhdWx0LXJvbGVzLWNvbXBhbnktZXh0ZXJuYWwiLCJvZmZsaW5lX2FjY2VzcyIsInVtYV9hdXRob3JpemF0aW9uIl19LCJyZXNvdXJjZV9hY2Nlc3MiOnsiYWNjb3VudCI6eyJyb2xlcyI6WyJtYW5hZ2UtYWNjb3VudCIsIm1hbmFnZS1hY2NvdW50LWxpbmtzIiwidmlldy1wcm9maWxlIl19fSwic2NvcGUiOiJvcGVuaWQgZW1haWwgcHJvZmlsZSIsImVtYWlsX3ZlcmlmaWVkIjpmYWxzZSwicHJlZmVycmVkX3VzZXJuYW1lIjoidGVzdC11c2VyIn0.J_HIqMzYEAD7WOXaFnog55R6Q-0uRQVIWIjjHW6gpOKMqdSwJD1mJMCZaO7n9D_Kz2dMxdvifw8Pi4Twgscdapt0ZKXfDuY7zaR4g6NN-w-Y3rxKPu1XrB_OSgr4HNr4B-LhuDra1elRMCnHYFM5CWdEHNADBKYqPTb2ndTh6jQfpVW7ExsLLORWgCC4Dj1EJvQLf9U6ygXEf_XM3ZwAsqFaWhVEPTVLxhYCrtwV9TEBItEwJmRQvbicrqUt-gNVLnsN7kQRAemNovWP6pWx_UbahmXsLFQXIeQ7C6TS9eTLyMk1Bo7kXHAH1p-mqICA9gYZdQ8l0wfn1KksCdIBoQ", "expires_in": 300, "refresh_expires_in": 1800, "refresh_token": "eyJhbGciOiJIUzUxMiIsInR5cCIgOiAiSldUIiwia2lkIiA6ICI4Mzk3OGVmYy00NmZlLTQ0MjgtOWY0MS1jYTlkOTE0NWEzNGYifQ.eyJleHAiOjE3NDI5MzIxNzMsImlhdCI6MTc0MjkzMDM3MywianRpIjoiY2Y5MGMyMzYtNWRiZS00NzAxLWFmZmQtZTUwMDJhMmVkODk0IiwiaXNzIjoiaHR0cDovL3Nzby5ob21lLmFycGEvYXV0aC9yZWFsbXMvY29tcGFueS1leHRlcm5hbCIsImF1ZCI6Imh0dHA6Ly9zc28uaG9tZS5hcnBhL2F1dGgvcmVhbG1zL2NvbXBhbnktZXh0ZXJuYWwiLCJzdWIiOiJlZjNmZjFlYy1mNDY3LTRhYWQtOTliMi0zMDQ2NmY3ZDZkNDAiLCJ0eXAiOiJSZWZyZXNoIiwiYXpwIjoibWZlLWEiLCJzaWQiOiI5NGI2MzA3MS1jYzg0LTRjMDgtYTFlYy00ZTZlMThkNTliMWUiLCJzY29wZSI6Im9wZW5pZCBhY3Igcm9sZXMgd2ViLW9yaWdpbnMgYmFzaWMgZW1haWwgcHJvZmlsZSJ9.xeVL_uJTAQxIc59sUXtc4Ogn1uT8KCTmvIwOmmBgcXnYzxpR3aaEPe59ppP7QwASu5iW-_IIVuis8FYzGok-4Q", "token_type": "Bearer", "id_token": "eyJhbGciOiJSUzI1NiIsInR5cCIgOiAiSldUIiwia2lkIiA6ICJHbXZ1Sjh2ZmdVd1BCSDZFS2FaQTB4M1djMWNFT1BxR01yc2d2WmNIWGRvIn0.eyJleHAiOjE3NDI5MzA2NzMsImlhdCI6MTc0MjkzMDM3MywiYXV0aF90aW1lIjoxNzQyOTMwMzU3LCJqdGkiOiI4ZjQ1MWJkZC00NTc0LTRjMjctODJkMC1kNGM5OWQ3NjE2ODkiLCJpc3MiOiJodHRwOi8vc3NvLmhvbWUuYXJwYS9hdXRoL3JlYWxtcy9jb21wYW55LWV4dGVybmFsIiwiYXVkIjoibWZlLWEiLCJzdWIiOiJlZjNmZjFlYy1mNDY3LTRhYWQtOTliMi0zMDQ2NmY3ZDZkNDAiLCJ0eXAiOiJJRCIsImF6cCI6Im1mZS1hIiwibm9uY2UiOiIyN2ZkM2UyYS03ZjcwLTRkOWYtODJiYi01MzQyNGJmMzA2Y2EiLCJzaWQiOiI5NGI2MzA3MS1jYzg0LTRjMDgtYTFlYy00ZTZlMThkNTliMWUiLCJhdF9oYXNoIjoiVUY5WnhnblFlUWhSZ0UyUGxMZDhhUSIsImFjciI6IjEiLCJlbWFpbF92ZXJpZmllZCI6ZmFsc2UsInByZWZlcnJlZF91c2VybmFtZSI6InRlc3QtdXNlciJ9.Gdy3EZCGgidI2fdachUu6WGiFKT3ZFLliaRvlrvFlzNVUBkPXWmecYHLawte9xo134kNCEzCsASpxQYiQVXYmth5_qCmoY93g6KJ4UX2BVCWGFFrxIO2i_R3NwTJ0PLw5FLu_2vpahmd9yqw3QVFEaVojEtSY5NH8jH_nbcOtNMFKWLcNB0ycwE7r8Uu-QyfUeDMUY76HAu9_aMaKgm5gBunVaR3mp1btu_3W6vuhuUNZRI2iGpQhWGZejg4xBgXAT7pLYUC83G80aNc_Gf_-eIpjIM570asWbmxf8fxsaOyH1X3Lqyh6rqoljOQlYBQ2UFfqFNmBawSc4MRpyEw7w", "not-before-policy": 0, "session_state": "94b63071-cc84-4c08-a1ec-4e6e18d59b1e", "scope": "openid email profile" }Here we are successfully authenticated in our first Angular applciation on http://mfe-a.home.arpa domain and get back tokens. Keycloak also created the session for the user ‘test-user’ and OIDC client ‘mfe-a’
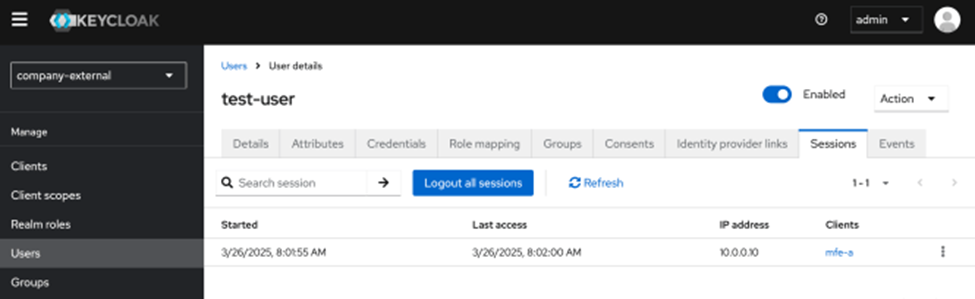
The JWT token is issued to the user test-user (preffered_username claim) and OIDC client mfe-a (azp claim), as you can see, according to the JWT token decoded payload below
{
  "exp": 1742930673,
  "iat": 1742930372,
  "auth_time": 1742930357,
  "jti": "0c9df145-1b47-42f7-acf5-3bc346c2928b",
  "iss": "http://sso.home.arpa/auth/realms/company-external",
  "aud": "account",
  "sub": "ef3ff1ec-f467-4aad-99b2-30466f7d6d40",
  "typ": "Bearer",
  "azp": "mfe-a",
  "sid": "94b63071-cc84-4c08-a1ec-4e6e18d59b1e",
  "acr": "1",
  "allowed-origins": [
    "http://mfe-a.home.arpa"
  ],
  "realm_access": {
    "roles": [
      "default-roles-company-external",
      "offline_access",
      "uma_authorization"
    ]
  },
  "resource_access": {
    "account": {
      "roles": [
        "manage-account",
        "manage-account-links",
        "view-profile"
      ]
    }
  },
  "scope": "openid email profile",
  "email_verified": false,
  "preferred_username": "test-user"
}
The other side of this authentication is that we got SSO cookies from sso.home.arpa:
- AUTH_SESSION_ID
- KEYCLOAK_IDENTITY
- KEYCLOAK_SESSION

Now, when we open mfe-b.home.arpa in the browser OIDC library redirects us to /auth endpoint again
http://sso.home.arpa/auth/realms/company-external/protocol/openid-connect/auth?client_id=mfe-b&redirect_uri=http%3A%2F%2Fmfe-b.home.arpa%2Fassets%2F&state=7b6a9cb5-f715-4674-b674-a222fd7850a1&response_mode=fragment&response_type=code&scope=openid&nonce=a0301b05-ba5d-4ebd-94f3-84a261416538&code_challenge=bIH090-u76HEZm_2HH5U2OEgbEr98TqPd0CWCh4Daio&code_challenge_method=S256
and browser automatically adds SSO cookies to the request, as shown below
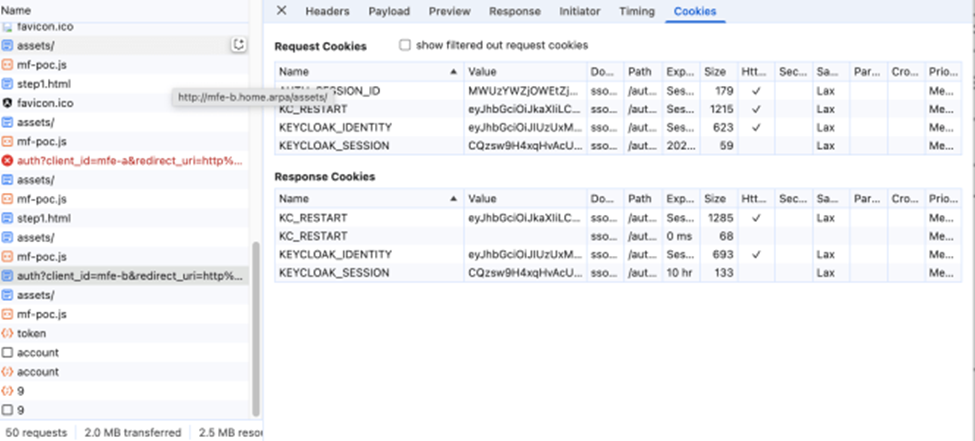
Now, Keycloak will authenticate the user during this request using SSO cookies that were previously set during authentication on mfe-a.home.arpa, and the UML sequence of authentication with cookies has been shortened:

If we check the sessions of our user in Keycloak under admin, we will see that there are two sessions now, and this is the nutshell of cookie-based SSO authentication.
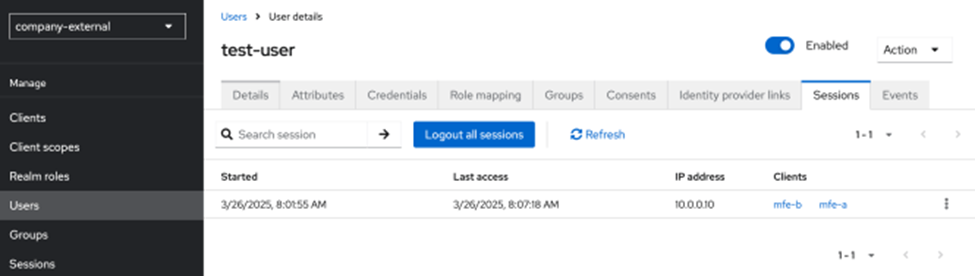
With as many applications and corresponding OIDC clients as you need, we can configure just the integrations and delegate the entire authentication to Keycloak.
I hope you found it helpful and interesting.
A practical example of implementing Keycloak cookie-based SSO was originally published in Level Up Coding on Medium, where people are continuing the conversation by highlighting and responding to this story.